Add Row
UPDATE
Add Element
Add Element
  • Home
  • Categories
    • Seasonal Yard & Property Care
    • Tools, Equipment & Product Insights
    • DIY Projects & How-To Guides
    • Pro Services & Local Highlights
    • Industry News & Trends
    • Sustainable Landscaping & Outdoor Living
October 13.2025
3 Minutes Read

Unlock the Secrets of Pruning Ornamental Grasses for Your Garden

Serene lush ornamental grasses in autumn garden

Your Guide to Pruning Ornamental Grasses for a Lush Garden

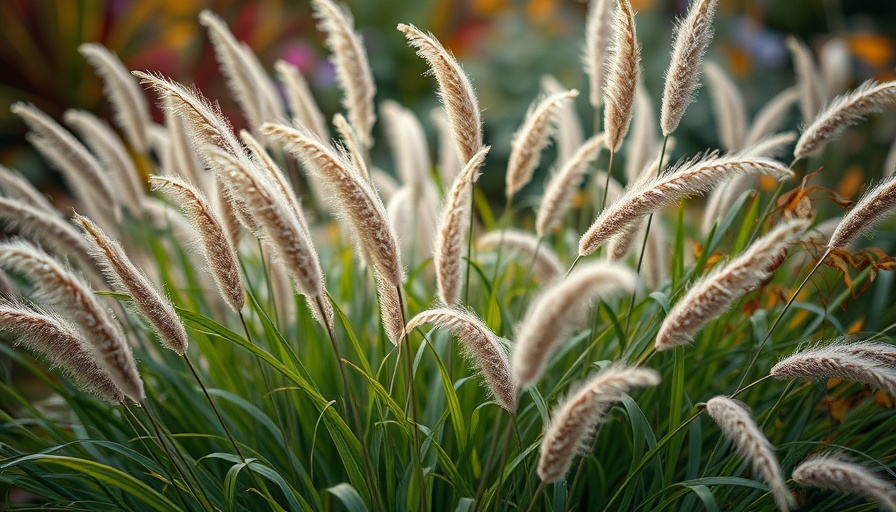
When it comes to enhancing your landscape, ornamental grasses are a show-stopping choice. They bring excitement to gardens with their textures, colors, and sound—swaying gracefully in the breeze. However, realizing their full potential requires knowing when and how to prune them properly. With advice from experts, we delve into the most effective methods for maintaining these hardy perennials.

Why Prune Ornamental Grasses?

Pruning may seem like a chore, but it plays a crucial role in the health and aesthetics of your ornamental grasses. As they age, old, dried blades can accumulate and create conditions for crown rot—preventing fresh growth from pushing through in spring. Cutting back old foliage not only boosts air circulation but allows for renewed vigor in the plant, showcasing the beautiful green blades that emerge as warmer weather sets in. Essentially, pruning is not just about aesthetics; it helps ensure your grass remains lush and vibrant.

Timing is Everything

Understanding the growth patterns of the different types of grasses can drastically affect your maintenance routine. Ornamental grasses fall into two primary categories: cool-season and warm-season. This classification determines when you should perform your cuts. Cool-season grasses, which grow best in temperatures below 75°F, need to be cut back in very early spring, before new growth starts appearing. Warm-season grasses, on the other hand, thrive through the summer heat and can be pruned in late winter or early spring, right before they start to grow again.

Knowing when to cut back these grasses helps you enjoy the stunning textures during winter while preparing for vibrant growth as temperatures rise. Many gardeners enjoy the sight of frost-kissed blades rustling in the wind, adding visual interest to the cold months.

Best Practices for Cutting Back

To achieve a clean cut and maintain your garden's beauty, it's essential to equip yourself with the right tools. Use sturdy pruning shears or, for larger clumps, an electric hedge trimmer can be fantastic. Always begin by gathering the stalks into manageable bundles; this not only makes cutting easier but also simplifies cleanup. Whether you choose to tie them with biodegradable twine or bungee cords, proper bundling protects you from sharp blades. Securely cut the grass by controlling your movement away from the base, preserving the shape of the remaining grasses. Once done, don’t forget to rake up any stray blades to keep your yard tidy.

Environmental Benefits of Ornamental Grasses

Beyond their visual effects, ornamental grasses provide numerous ecological benefits. Many species are drought-tolerant and suitable for a variety of soils, which makes them an excellent choice for sustainable landscaping. Their ability to thrive with minimal resource investment reflects a resistance to changing weather patterns, a vital trait as we face more extreme climates. Furthermore, these grasses serve as natural habitats and forage for insects, birds, and small mammals during harsh weather—demonstrating their value well beyond just aesthetics.

Practical Tips for Muskegon Gardeners

If you reside in Muskegon, or similar regions, consider integrating ornamental grasses into your landscaping plans. Not only can they enrich your garden, but they also offer an ideal way to create a vibrant, ecologically balanced environment. If you’re planning to start a backyard project, ornamental grasses can be paired beautifully with raised soil beds, offering handy partitions in your garden. When you're crafting outdoor spaces or designing garden aesthetics, consider using these resilient plants to enhance your layout.

Conclusion: When to Schedule Your Pruning

As the seasons change, so do the needs of your ornamental grasses. Timing your pruning to coincide with the natural cycles of the plants will ultimately reward you with healthy growth that enhances your yard's beauty throughout the year. Mastering the cutting techniques outlined can provide a lush and vibrant garden. Ready to start your project? Dive into the world of planting and enjoy the endless benefits of ornamental grasses in your Muskegon garden today!

DIY Projects & How-To Guides

1 Views

0 Comments

Write A Comment

*
*
Related Posts All Posts
01.19.2026

Why You Should Prune Your Wisteria in January for Bountiful Blooms

Update Understanding the Importance of January Pruning Wisteria, known for its stunning blooms, requires careful pruning to maintain its beauty and structural integrity. January serves as a crucial time for winter pruning when the plant is dormant. This period allows gardeners to manage the plant's growth and promote abundant flower production. Without proper pruning, wisteria can quickly become a chaotic climber, potentially damaging nearby structures. Why Two Pruning Sessions Are Essential Timing pruning sessions is vital. Wisteria needs to be pruned twice a year: once in the summer and once in winter. Summer pruning, done in late July or August, manages excessive growth during the active season. This is essential for controlling size and promoting healthy flower production. On the other hand, winter pruning in January or early February focuses on refining the plant's shape, allowing for a clearer view of structural issues without the distraction of dense foliage. How to Prune Wisteria Effectively This January To prepare for a successful pruning sessions, ensure you have sharp shears and a lopper available. Before beginning, clean your tools to prevent disease spread. Here’s a step-by-step guide: Cut Back Shoots: Begin with side shoots that you previously pruned in summer. Aim to shorten these shoots to promote flowering. Remove Worn Out Growth: Identify and cut back any old, unproductive growth to invigorate the plant. Seek out brittle or unhealthy branches and prune them back to living wood. Trim Back Overgrowth: Address any branches that have grown excessively into unwanted areas. This will maintain the integrity of your garden space. Improve Shape: Periodically assess the overall appearance of your wisteria as you prune. Correct any structural issues and ensure a balanced, attractive shape. The Benefits of January Pruning Pruning wisteria in January maximizes the potential for flower production. The timing is ideal because it allows the pruner to make strategic cuts at a time when the plant's energy can be redirected towards flowering rather than vegetative growth. Facilitating airflow and sunlight penetration through proper pruning also improves the health of the plant while providing a stunning display in spring. Common Misconceptions About Wisteria Pruning Many gardeners may fear that pruning wisteria will harm their plants. In reality, regular pruning ensures that wisteria remains healthy and vibrant. Neglecting to prune can lead to an overly dense plant that produces fewer flowers and may even damage structures it climbs. Winter is an excellent time for cuts because the lack of leaves makes structural evaluation straightforward and effective. Connect with Local Gardening Opportunities If you’re inspired by the idea of cultivating your own backyard garden, now is the perfect time to explore various projects. Whether you’re looking to start a backyard planting box Muskegon or construct outdoor soil beds Muskegon, there are resources available to help you succeed. Pruning wisteria is just one aspect of maintaining a vibrant, flourishing garden. Incorporate elevated planter boxes or even build a composting barrel to enhance your gardening experience. To further enhance your outdoor space, consider embarking on DIY projects like a rustic gate or an arched plant support project. These can not only bolster your garden’s aesthetic but provide greater utility, making your home a more serene escape. Inspiring Quotes to Motivate Your Gardening Journey “To plant a garden is to believe in tomorrow.” — Audrey Hepburn. This sentiment resonates especially this time of year as you take proactive steps toward creating the garden of your dreams. As you prune your wisteria this January, remember that you’re not only shaping a beautiful plant but also cultivating an environment that brings joy and fulfillment. Why not start engaging in more yard projects today? Take your landscaping skills to the next level!

01.19.2026

How to Create an Affordable DIY Seed-Starting Station for Spring

Update Creating a Thriving Seed-Starting Station on a Budget For many gardening enthusiasts, the urge to grow their own plants starts with a simple desire to cultivate a garden filled with vegetables, herbs, and vibrant flowers. Setting up a DIY seed-starting station doesn't have to be expensive; with a bit of creativity and planning, you can create a productive growing environment for under $50. Whether you’re in Muskegon or beyond, embracing the art of seed starting this spring is an excellent way to ensure your plants are ready to thrive when the soil warms up. Here’s how you can set up a DIY station that fits your budget while maximizing your growing potential. Essential Components of Your Seed Starting Setup When establishing a seed starting station, it’s crucial to know what you need before you begin. The basic items include: Seed starting containers Seed starting mix or soil Seeds A light source A watering method These essentials can often be sourced from repurposed household items or through community connections. Many experienced gardeners recommend checking local nurseries for leftover pots or using everyday items like yogurt containers, egg cartons, and toilet paper rolls for seed starting. This resourcefulness not only reduces costs but is also a fulfilling aspect of DIY gardening. Control the Environment Beyond the basics, controlling the environment for your seedlings is vital for success. This can include: Grow lights A heat mat Seed starting trays A simple shelf with lights overhead can provide ample brightness, ensuring healthy, robust seedlings. In the Muskegon area, where sunlight may sometimes be limited, grow lights become essential, especially during the cooler months. Mixing Your Own Seed Starting Soil The mix you use plays a significant role in seed germination. Here’s a simple recipe for a homemade seed starting mix that you can create using ingredients you may already have: ⅓ moisture-retention materials like coir or peat moss ⅓ drainage components such as perlite or pumice ⅓ fertility enhancers like compost This homemade mix not only saves you money but also ensures that you know precisely what your seedlings are growing in, making for a healthier start. Beyond Containers: Innovative Seed Starting Techniques Consider alternative methods to traditional seed starters—techniques that utilize readily available tools. For example: Egg Cartons: These can be used as biodegradable seed trays, perfect for starting your seeds. Each compartment holds individual seedlings until it’s time to transplant. Plastic Containers: Old yogurt cups or takeout containers are brilliant for this task; just make sure to poke drainage holes at the bottom. Newspaper Pots: Roll newspaper strips into small pots that can be planted directly into the soil. These methods are not only budget-friendly but also promote sustainability by repurposing materials that would otherwise be discarded. Watering Wisely Effective watering does not require any expensive equipment. A simple spray bottle, or even a milk container with holes punched in the lid, will work well. Water gently to avoid disturbing the delicate seedlings. Getting the Most Out of Your Seeds To reduce expenses even further, consider collaborating with fellow gardeners in Muskegon for seed swapping. This community approach to gardening not only saves money but also fosters relationships within the gardening community. Additionally, make sure to label your seedlings clearly. Effective identification will help you manage your garden better as it matures, thus minimizing confusion come transplant time. Reusing old plastic containers or popsicle sticks can create excellent markers. Final Thoughts: Sowing Seeds for Success Creating a DIY seed starting station for under $50 is not just achievable; it can be a fun and rewarding process that fosters a love for gardening. By using creativity to repurpose household items, save costs, and involve community resources, you can enhance your gardening experience while still having a positive environmental impact. Embrace this opportunity to connect with nature and embark on your gardening journey! For those looking to ramp up their outdoor projects further, explore innovative ways to start a backyard planting box Muskegon or even construct outdoor soil beds Muskegon for your spring endeavors. Happy gardening!

01.19.2026

When is the Right Time to Move Your Tomato Seedlings into Larger Pots?

Update Understanding Transplant Timing for Tomato Seedlings Transplanting tomato seedlings at the right time is crucial for fostering a robust root system that propels healthy growth. Recognizing when your seedlings are ready to graduate to larger pots is key: typically, seedlings should be around four inches tall with two sets of true leaves. A common misconception is that the initial cotyledons, or seed leaves, count as true leaves; however, they're merely a precursor to the more recognizable tomato foliage. The Significance of Pot Sizes Choosing the correct pot size is vital. While five-inch pots are ideal for early-stage tomato seedlings, be mindful of avoiding overly large containers that can lead to overwatering. Seedlings require containers that allow them to firmly establish roots while ensuring adequate drainage. Undoubtedly, drainage holes are a must to prevent waterlogging, which can be detrimental to young plants. As such, selecting individual pots over shared containers also heightens the chance of successful growth due to optimized air circulation. Crafting the Right Soil Mix Your seedlings thrive best when not planted in the same seed starting mix used for germination. Instead, aim for a nutrient-rich potting mix that can support tomato seedlings through their initial growth stages. An effective concoction might include a blend of 60% potting soil, 20% compost, and 20% perlite. This mixture maintains both the oxygen necessary for root health and the moisture required for nutrient absorption, setting the foundation for a flourishing plant. Common Pitfalls in Transplanting While the initial excitement of transplanting can lead to hasty decisions, several missteps can impede your seedlings’ progress. Avoid waiting too long to transplant, as the roots can become rootbound, stunting growth. Similarly, it's crucial not to overwater your seedlings immediately following transplant to prevent root rot. Instead, opt for bottom watering after the initial settlement period; this reinvigorates the potting mix and encourages roots to reach deeper for moisture. Practical Tips for Successful Transplanting Harden Off Your Seedlings: Before you shift seedlings outdoors, ensure they're acclimated by hardening them off. Gradually expose them to sunlight and outdoor conditions. Use Quality Containers: If you lack nursery pots, consider reusing plastic cups with drainage holes to keep your seedlings happy. Observe and Adjust: Continue to monitor your plants for signs of stress or overexposure to sunlight, making adjustments as needed to ensure a smooth transition. Add Support: As your tomato plants grow, integrate support structures to avoid damage. This helps prevent leggy growth and encourages fruitful production. Conclusion: Enhance Your Growing Experience By paying close attention to the timing of when to move your tomato seedlings into larger pots and how to effectively handle them during the transplanting process, you set yourself up for a successful gardening experience. Each step, from selecting the appropriate pot to using the right soil mix, is integral to the health and vitality of your plants. Ready to expand your gardening efforts? Whether you're interested in starting a backyard planting box in Muskegon or exploring advanced gardening techniques, we encourage you to delve deeper into the realms of outdoor planting and nurturing vibrant, thriving gardens that can be enjoyed throughout the seasons.

Terms of Service

Privacy Policy

Core Modal Title

Sorry, no results found

You Might Find These Articles Interesting

T
Please Check Your Email
We Will Be Following Up Shortly
*
*
*